So I was experimenting with some other designs that revolved around squirts of paint and lots of different colours and I wanted to have a fluid acrylic painting as a base.
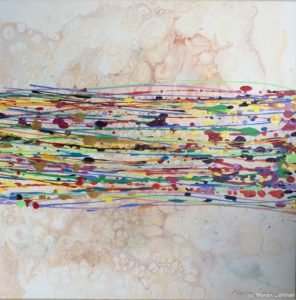
I came up with the following painting after a couple of other efforts and I really like how it has come out.
The base is a very light coloured fluid acrylic painting. I did it mostly using white paint with some pale umber/cream mix, gold and a bit of bronze in a dirty pour out of a plastic container. I only added a little of the colours to the pour and I added some silicone into the pale umber/cream mix so that some cells would form.
I applied the paint by pouring it on in a spiral pattern, starting from the inside, in the middle of the canvas. I then tilted the canvas so that all of the paint got to the edges (having used my usual trick of putting masking tape on the edges of the canvas). I painted the edges of the canvas with some of the remaining paint from the plastic pot, mixed in with spillages from the side.
I then sprinkled some glitter and some copper powder sparingly onto the painting and allowed it to dry. It took a day and a half as the weather wasn’t that great!
One the canvas was completely dry I was in two minds about whether I wanted to use it for something else as I liked the pattern it had produced! But I figure nothing ventured, nothing gained so I went ahead with what I planned.
I had got hold of a bunch of cheap plastic sauce pots like the ones below that you can find on Amazon (UK and US links shown):
These give a really good nozzle size for squirting thin lines of paint. You can also make the nozzles bigger if you want to by cutting them. You do need to water the paint down a bit to make it easy to squeeze out but it does depend on what kind of paint you have as to how much you need to do this.
Anyway, so I actually made up about 10 bottles of different colours (plus some from bigger nozzled bottles like sports water bottles that give a more blotchy effect). It is best to test the line on an old canvas first and then give it a loose squeeze on the painting (don’t try and be too precise).
I like to add a bit of gold in there and also some more glitter when the lines are wet.
You can do some lines and let them dry so that they don’t all blend into each other too much. I am really happy with the result but can’t quite decide whether to give it a resin coating or leave it as is!
hello. my name is jeff and I am new to acrylic art. I have a problem I cannot seem to fix. I also use acrylic resin on a 1 to 1 mixture to coat my acrylic pours. As you agree, It really makes the colors explode. however, I have found that many times the acrylic resin will “pool” and leave unsightly “dead spots”, or uncovered places on the canvas. I am not sure why…is it something in the acrylic paint that has dried that “expels” the acrylic resin coating? why does affect some canvas pours and not others? even after repeated coats of acrylic resin to cover these “dead zones”, the resin coating still pools and will not fill in the “blemishes” on the previously covered pours. does this make sense? why does the acrylic resin avoid some areas of the acrylic pour/painting and not others? i am very frustrated!!! help
Hi Jeff, yes I know exactly what you mean! It is the silicone coming to the surface which does not mix with the resin and so rejects it in those areas. I’ve seen quite a few solutions to this problem but sometimes they don’t work for me either! The solutions I have seen are; coat it in flour and leave that to soak the resin then brush it off and after that wipe the painting with dish soap. Another one is to mix a few drops of silicone into the resin but make sure you mix well. Next time this happens I am going to try leaving it to dry for a couple of weeks, then wipe off the silicon with dish soap and completely drying it before putting the resin on.